
A Little Light on Pot Lights: Everything You Didn’t Know You Needed to Know
Once relegated to outdated basements and office tiles, pot lights have undergone a full-blown glow-up. Today’s LED versions are sleek, energy-efficient, and loaded with features — dimmable, tunable, smart, and compact enough to install just about anywhere you can cut a hole (or where someone already has cut a hole and you need to make it look like it was on purpose).
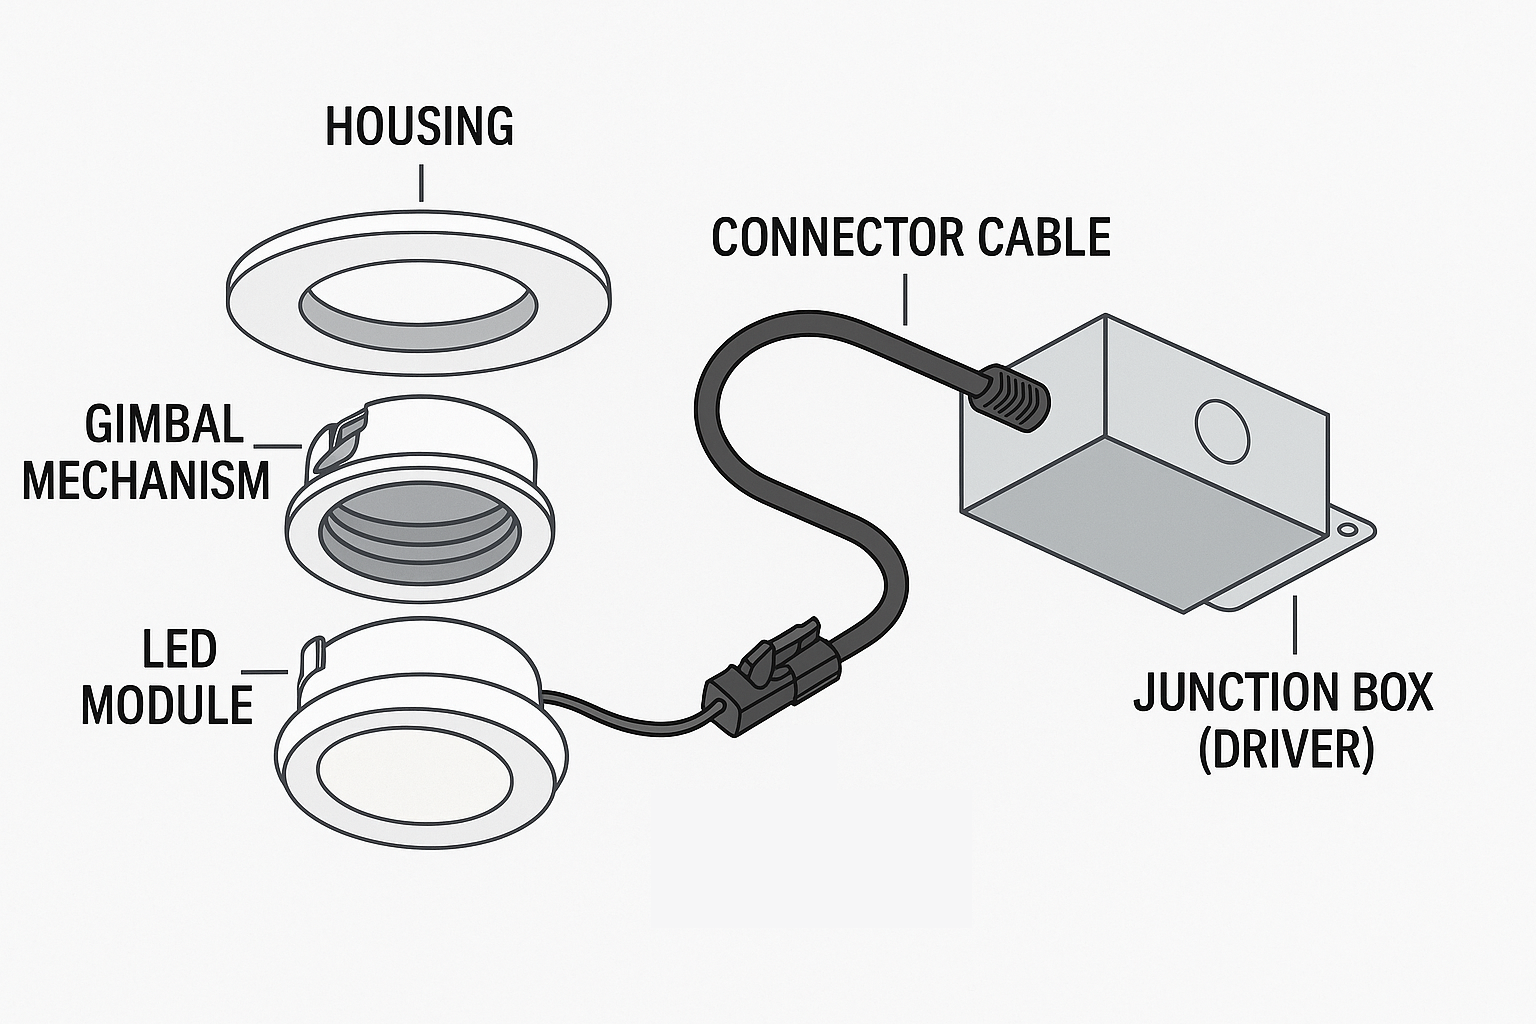
In technical terms, LED pot lights (also called recessed lights or down lights) are flush-mounted ceiling fixtures that emit directional light. In practical terms, they’re the go-to solution when you want a clean, modern look and consistent coverage — without hanging anything from your ceiling. But not all pot lights are created equal.
Let’s look at the main types, when to use them, and what you absolutely should not do.
Flat (or Fixed) Pot Lights are the default option. These aim straight down, giving you even, general-purpose illumination. They're ideal for rooms where the layout is simple and symmetrical — think kitchens, hallways, or retail spaces with evenly spaced islands of light.
Gimbaled (or Adjustable) Pot Lights are the multitaskers. They tilt and swivel in one or more directions, letting you highlight artwork, aim at countertops, or compensate for sloped ceilings. Great for tasks, accents, or getting creative when your joist layout wasn’t quite as cooperative as you’d hoped.
Then there are the specialty variants:
· Wall-wash trims: Angled to cast light down a wall — perfect for gallery vibes.
· Shower-rated or wet-location fixtures: Safe for steamy bathrooms or covered soffits.
· Ultra-thin wafers: Designed for shallow ceilings or tight spaces where traditional housings won’t fit.
· Fire-rated models: For condo units, commercial installs, or any place where building code demands a little more muscle.
Bottom line? Know the angle and the application before you buy.
If there’s one thing LED pot lights have taught us, it’s that just because you can cut 20 holes in your ceiling, doesn’t mean you should.
When planning your layout, it’s all about balance — between brightness and shadows, aesthetics and practicality, and yes, your lighting dreams and your drywall reality.
Start With the Basics: Spacing Rules of Thumb
A well-lit room doesn’t just depend on how many pot lights you install — it’s where you put them that makes the real difference.
A good general rule is this: Space your pot lights about half to three-quarters the height of the ceiling.
So, for an 8-foot ceiling, aim to space your pot lights about 4 to 6 feet apart. This helps ensure even coverage without dark spots or overly bright areas.
Here’s why that works:
- Too close together = harsh, overlapping light and wasted energy (not to mention more work for your electrician).
· Too far apart, and you’ll get dark zones or uneven shadows — especially on walls or working surfaces.
Edge Distance: Don't Hug the Walls
Avoid placing pot lights too close to the wall — a common rookie mistake. Fixtures should typically sit at least 2 to 3 feet away from vertical surfaces to prevent harsh shadow bands (unless wall-washing is your goal). For example, if you’re trying to light artwork, gimbaled lights closer to the wall can work — but if you’re just lighting a room, give those walls breathing room.
Lighting Zones: Task vs Ambient
Break the room into zones:
· Ambient lighting: Your general, overhead wash — keep it soft and even.
· Task lighting: Focused beams over kitchen islands, desks, or reading chairs.
· Accent lighting: For cabinets, artwork, or dramatic design flair.
Pot lights are flexible enough to cover all three, but you may need to mix and match spacing and beam angles.
For example:
Over a kitchen counter? Space gimbaled pots every 3-4 feet, 12–18 inches from the wall, and angle them inward.
In a living room? A wider spread of flat dimmable fixtures is often best.
Avoiding the “Runway” Look
Even spacing in straight lines can look sterile or commercial if you’re not careful. Consider offsetting rows slightly or breaking up symmetry with a centered focal point, like a pendant or chandelier, to soften the grid.
Beam Angles & Brightness Affect Layout
Most pot lights have a beam angle between 30° and 60°. Narrower beams give tighter focus (great for task areas), while wider beams create smoother overall coverage.
Brightness matters too — 800 lumens from a 9W LED is bright enough for many rooms, but if your pot lights are only source of light, especially in rooms with dark paint or no windows, you might need tighter spacing or supplemental lighting.
Height Matters
In tall ceilings (9’+), you may need higher-lumen fixtures. Shallow ceilings (with no attic access or only drywall depth) often require ultra-thin wafer lights, and your layout must accommodate joist spacing and obstructions.
Retrofitting? Let the Stud Finder Be Your Guide
If you’re adding pot lights to a finished ceiling, it’s not just about where you want them — it’s about where they’ll actually fit. Use a stud finder or bore scope to map out joists, plumbing, and insulation before committing to a layout.
Dimming & Layering: Not Just a Mood
A thoughtful layout doesn’t just rely on placement — it’s enhanced by dimmers and layering. If you're putting in 10 lights, consider wiring them into two or more zones so you can adjust the vibe. Full brightness during cleanup, low and cozy for a dinner party. Easy win.
Installing pot lights seems simple — and it can be — but there are a few common pitfalls that can turn your lighting plan into a headache (or worse, a patch job).
Installation Pitfalls to Avoid
Let’s run through the top things to watch for and plan around, whether you're working with a contractor or tackling a small retrofit yourself.
1. "Measure Twice, Cut Once" Is Still Underrated
Sounds obvious, but it’s astonishing how many people grab the hole saw before confirming their layout, ceiling obstructions, and fixture size. Make a paper template, mark everything in pencil, and then start cutting.
Bonus tip: many pot lights have a specific cutout size (e.g., 4.25"). Double-check the manufacturer’s spec sheet — the trim size and cut size are not always the same.
2. CCT Switches Belong on the Ground, Not in the Ceiling
Most modern LED pot lights have a CCT selector switch — usually tucked away in the junction box. If you forget to set it before the fixture is installed, you may have to take it all back out to make a change.
Pro move: lay out all the fixtures, decide on the colour temperature per room (e.g., 2700K for cozy, 4000K for kitchens), and set them all on the ground.
3. Don’t assume there’s Room behind the Drywall
This is especially important when retrofitting older homes or basements. You may run into shallow joists, strapping, ductwork, or mystery 2x4s. Use a bore scope or carefully drill pilot holes to see what you're working with. If depth is an issue, go with ultra-thin wafer lights — they only need a few centimetres of clearance.
4. Keep It Level
A slightly crooked pot light will haunt your ceiling forever. Use a laser level, chalk line, or a straight edge across joists to keep the layout tight. Crooked rows are more noticeable than you think — especially with gimbaled fixtures that can cast directional shadows.
5. Bathrooms, Soffits, and Damp Locations Need Special Fixtures
Not all pot lights are created for moisture. If you’re installing in a bathroom ceiling, covered soffit, or laundry room, make sure you’re using a damp-rated or wet-rated fixture — and that your electrician knows where it’s going. These models are sealed tighter and safer for humid environments.
6. In Some Places, Fire Ratings Are Code — Don’t Skip It
For multi-unit residential or some commercial installs, fire-rated pot lights are often required to maintain the integrity of fire separations between floors or units. These lights have built-in materials that resist flame and heat for a set time, helping to slow the spread of fire. They’re a bit bulkier, but it’s peace of mind (and helps avoid headaches with inspectors).
7. Use Goof Rings When Things Go... a Little Goofy
If you're retrofitting into an existing ceiling and the old hole is just a bit too big, don’t panic — goof rings (also called oversize trim rings) are designed for exactly that. They cover gaps and let you use your new pot light without redoing the entire ceiling. A very elegant solution to a very common problem.
Where Pot Lights Shine
If lighting had a Swiss Army knife, pot lights would be it. Their slim profile and directional flexibility make them a favorite in almost every room — and on the outside of the house too. But they’re not one-size-fits-all. Here's where LED pot lights excel, and what to consider when choosing them for each space.
Bathrooms
Pot lights are a natural fit in bathrooms — especially for shower areas, vanity zones, or general overhead light. Just make sure you're using damp-rated or wet-rated fixtures (depending on how exposed they are to direct moisture). Gimbaled lights near the mirror can be angled to reduce shadows, while flat fixtures provide good ambient coverage. Use a dimmer and you've got instant spa vibes.
Kitchens
Possibly the most popular use case. You’ll see pot lights everywhere from open-concept kitchens to small galley layouts. Key tips here:
· Use task lighting over counters and islands — space gimbaled pots around 3 feet apart and angle them inward.
· Combine with pendants or under cabinet lighting for a layered effect.
· Go for a CCT around 3000K to 4000K — neutral white that keeps food looking good without feeling sterile.
Living Rooms & Open Concepts
LED pot lights are great for general illumination in larger spaces, but they can also double as accent lighting for walls, plants, or built-ins. Use gimbaled fixtures to highlight bookshelves or art, and flat ones for broad area lighting. Break your lights into multiple zones if possible — you don’t always want everything at 100%.
Offices & Workspaces
Here, glare control and consistent brightness matter. Go with a wider beam angle and higher CRI (90+ is ideal) to reduce eye strain. Daylight temperatures (4000K–5000K) can help keep energy levels up during the workday.
Bedrooms
Keep things soft and warm here — 2700K to 3000K is perfect for winding down. A few well-placed pots over dressers or in reading corners can replace bulky lamps. Dimming is a must.
Hallways & Stairs
Pot lights shine in narrow spaces like hallways. They eliminate dark spots, especially in homes with limited natural light. Stick with flat, evenly spaced fixtures and avoid overdoing it — you want a guiding glow, not a landing strip.
Basements
Basements often lack ceiling height, making wafer-style ultra-thin pot lights the MVP. Pair them with light paint and strategically placed lamps to make the space feel less cave-like. CCT selectables are great here too — you can adjust depending on how the basement is used (gym, rec room, office, etc.).
Soffits & Outdoor Eaves
Yes, pot lights go outside too — especially wet-rated models that can be installed in covered soffits or eaves. These are perfect for architectural highlights or subtle entryway lighting. Choose a warmer CCT (2700K–3000K) for a cozy glow, and make sure the housing is rated for exterior use.
Not All Pot Lights Are Created Equal – Features to Know Before You Buy
Once upon a time, picking a pot light meant deciding between "white trim" or "maybe also white trim." These days, there’re full of features, acronyms, and upgrades. Here's a quick guide to the extras that might actually be worth your attention — and a few you might not have known existed.
CCT Adjustable
Most modern LED pot lights now come with a CCT switch (Correlated Color Temperature), allowing you to toggle between five or six different colour temperatures — usually from 2700K (warm white) to 5000K (daylight). This is especially useful if:
· You're not sure what mood works best until you see it.
· You're installing the same fixture across different rooms.
· You just want to future-proof your lighting setup.
· Set it before you install the fixture — especially if the switch is in the junction box. (We said it earlier but it bears repeating.)
Fire Ratings
If you’re working in a multi-unit building or any situation where fire separations are part of the code (think condos, apartments, some commercial spaces), you'll need pot lights that are fire-rated. These fixtures are tested to resist heat and flames for a set time (often 30, 60, or 90 minutes), helping slow the spread of fire between units or floors.
They’re a bit bulkier, but it's not the kind of feature you want to skip — both for safety and for passing inspections.
Smart Pot Lights
Yes, even ceiling fixtures can be smart now. Some models let you:
· Change colours (not just CCT, but full RGB spectrum)
· Schedule on/off times
· Dim remotely
· Sync with Alexa, Google Assistant, or app-based controls
Do you need them? Maybe not. But in a nursery, media room, or home office, the ability to control lights without getting up has its perks. Just remember: smart lights typically need a consistent Wi-Fi connection, so make sure your signal is strong where you're installing.
Goof Rings
Sometimes a previous fixture left a big cutout. Sometimes your hole saw danced a little to the left. It happens. A goof ring (also called a trim plate or oversize ring) can save the day by covering the gap around your pot light with a neat finish. They come in a range of sizes and can be painted to match your ceiling.
Think of them like a ceiling Band-Aid — nobody needs to know.
Other Worthwhile Features to Watch For
· High CRI (>90): For better, more natural-looking colours — especially in kitchens, art spaces, or retail.
· Damp or Wet Location Rating: For bathrooms, laundry rooms, and exterior soffits.
· Wide or Narrow Beam Angles: To control how focused or spread out your light appears. Narrow beams (under 40°) for accenting; wide beams (above 80°) for general lighting.
· IC Rated: Safe for direct contact with insulation (important for ceilings with no attic access).
Conclusion & Common Questions – A Light at the End of the Tunnel
LED pot lights might seem like the simplest fixtures out there — just a circle of light in the ceiling, right? But as we’ve seen, they’re a deceptively complex category full of choices, tradeoffs, and little details that make a big difference once they’re in.
Whether you’re planning a full-home retrofit, replacing a few outdated cans, or designing a commercial space, understanding the types, layouts, features, and use cases can help you avoid common mistakes — like mismatched color temperatures, poor spacing, or installing non-rated fixtures in damp areas.
The good news? Once they’re in and done right, pot lights are practically invisible workhorses. They don’t ask for attention — they just make everything around them look better.
Quick Questions We Get All the Time (And Honest Answers)
💡 Are pot lights dimmable?
Most modern LED pot lights are, but check the box. And always pair with compatible dimmers to avoid flicker or dropout.
💡 Can I install them myself?
If you’re comfortable with electrical work and local code allows it — maybe. Otherwise, we always recommend a licensed electrician.
💡 Can I use these outside?
Only if they’re wet-rated. Regular indoor models can fail (or worse) in exposed conditions.
💡 How long do they last?
Typically 25,000–50,000 hours, depending on quality. That’s over a decade with regular use — just don’t install them in overly hot or enclosed spaces unless they’re rated for it.
💡 Can I mix different types in the same room?
Yes — and sometimes you should. A mix of flat and gimbaled fixtures can help balance general lighting and accent work, especially in kitchens or living rooms.
💡 Do I need to pick a color temperature before installing?
Not if your fixture is CCT adjustable — but double check whether the switch is accessible after installation. Some aren't.
If you’re still not sure what’s right for your home, workspace, or commercial install, you know where to find us. We’ve got samples, advice, diagrams, goof rings, and most importantly, real people who’ve actually installed this stuff.